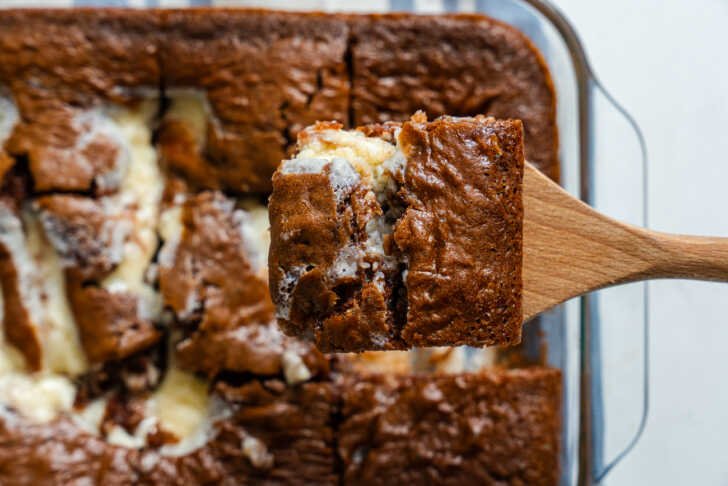
The Classic Earthquake Cake is a legendary dessert for a reason. It’s a visually stunning, deliciously messy cake where a creamy cheesecake layer sinks into a chocolate cake base, creating a “cracked” or “earthquake” appearance. The coconut and pecan layer on the bottom becomes a gooey, caramel-like topping when flipped out.
Here is a clear, step-by-step recipe based on your ingredients.
Classic Earthquake Cake
Yields: 12-16 servings
Prep time: 20 minutes
Bake time: 45-55 minutes
Cool time: 1-2 hours
Instructions
Step 1: Prepare the Pan and Oven
-
Preheat your oven to 350°F (175°C).
-
Grease a 9×13-inch baking pan.
-
This is key: Evenly sprinkle the 1 cup of sweetened, shredded coconut and 1 cup of chopped pecans over the bottom of the greased pan. Set aside.
Step 2: Make the Cake Layer
-
In a large bowl, combine the German chocolate cake mix, 1 cup of water, ½ cup of oil, and 3 eggs.
-
Beat with an electric mixer on medium speed for 2 minutes, until smooth and well combined.
-
Carefully pour the cake batter over the coconut and pecan layer in the pan, spreading it evenly.
Step 3: Make the Cream Cheese Filling
-
In a separate medium bowl, beat the 8 oz package of cream cheese and ½ cup of softened butter together until the mixture is completely smooth and creamy.
-
Beat in the 1 teaspoon of vanilla extract.
-
Gradually add the 2 cups of powdered sugar, about ½ cup at a time, beating well after each addition until the filling is smooth and lump-free.
Step 4: Create the “Earthquake”
-
Drop spoonfuls of the cream cheese filling randomly over the top of the cake batter.
-
Take a knife or a spatula and gently swirl it through the two batters. Do not over-swirl! You want distinct ribbons of cream cheese, not a fully blended mess. 4-5 figure-eight motions are plenty.
Step 5: Bake
-
Place the pan in the preheated oven and bake for 45-55 minutes.
-
The cake is done when the top is cracked and set, and the edges are pulling away from the pan. The center might still seem a little jiggly, which is fine—it will set as it cools. A toothpick inserted into the cake part (not a cream cheese swirl) should come out with moist crumbs.
Step 6: Cool and Serve
-
Remove the cake from the oven and let it cool completely in the pan on a wire rack. As it cools, it will sink and crack further, creating the final “earthquake” look.
-
Once completely cool, slice and serve directly from the pan.
Helpful Tips for Success
-
Ingredient Temperature: Using softened (room temperature) cream cheese and butter is non-negotiable for a smooth, lump-free filling.
-
Don’t Over-Swirl: The marbling effect is beautiful, but if you swirl too much, the cream cheese filling will just blend into the cake and won’t create those delicious, distinct pockets.
-
The “Jiggle” Test: The cake will look underdone in the center when you take it out. This is correct! It will firm up significantly as it cools. Overbaking will make it dry.
-
Storage: Cover and store any leftovers in the refrigerator for up to 5 days. This cake is actually even better the next day once the flavors have melded!
-
Serving Suggestion: It’s fantastic on its own, but a scoop of vanilla ice cream or a dollop of whipped cream takes it over the top.
Enjoy this rich, decadent, and wonderfully chaotic classic dessert